Using AWS S3 as a low cost, offsite backup solution
Introduction
For some time, I have used a Raspberry Pi 3+ as a simple home server running Samba as an on-site backup for my various computers. It works well in this role, but I have been missing as offsite backup in case the Raspberry Pi, or the drive using it fails and I suffer a data loss. I recently began working with the Amazon Web Service (AWS) ecosystem of cloud based computing solutions, and I realised that S3 would be a good solution for a offsite backup, as it has lower costs compared to other cloud storage platforms. Having a offsite backup in the cloud means I can also access the files outside of my home network without having to deal with exposing my samba share to the internet.
AWS also has a command line tool to run commands relating to their service on your local device, and in the case of S3, you can use sync to sync the contents of a local directory to a bucket. As we are running this on a Raspberry Pi, AWS have released a special version for ARM-based computers like the Raspberry Pi.
Creating an IAM user
First, we need to create an IAM (Identity and User Management) user account to control the access to the S3 bucket. I assume you already have a AWS root account to operate the AWS management console with. If you do not, please create one just now, as you wont be able to carry out any of these steps without one.
In the AWS management console, navigate to the IAM section and select create a new user.
-
Please select a name for your user. It’s best to keep it nice and memorable, like “Offsite-Backup-User”. You then need to select
Programmatic Access, as this will generate secure credentials to set up the aws-cli tool with. -
You should then select the permissions this user will have. It is most secure to follow the “Principle of Least Priviledge”. In other words, don’t give this user powers it won’t need to carry out its task. For example, it needs to access S3 buckets, but it does not need to create EC2 instances or RDS databases. As a result, you only need to apply the
AmazonS3FullAccesspolicy to get the necessary permissions.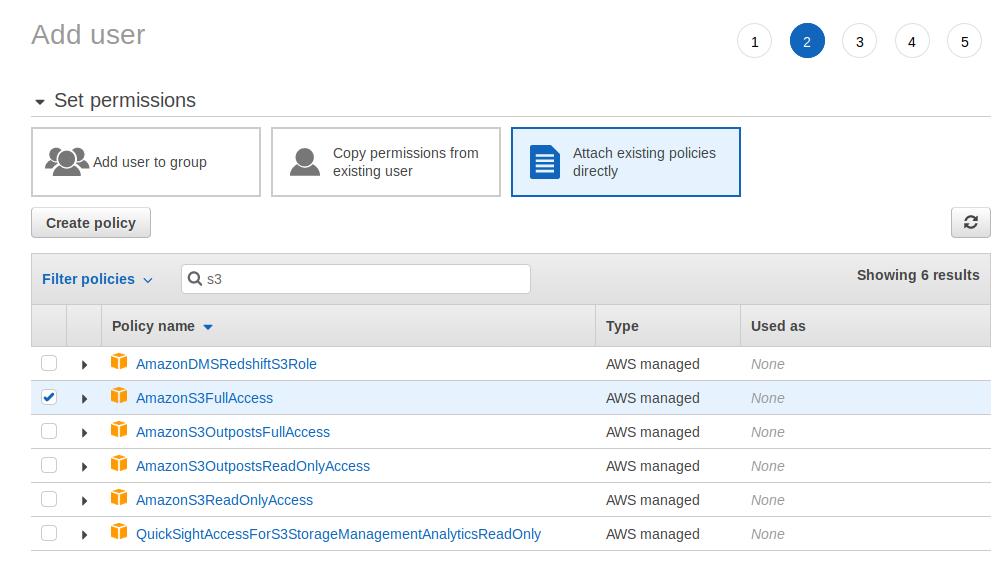
-
You can now apply tags to the user to help with tracking or compliance, but its not needed for this project.
-
Check what you’ve entered under review, and go back and fix any mistakes that may have taken place.
-
Now you can download a .csv file with your Access Key Id and Secret Access ID. Keep good care of these creds, you need them for later, and they can be used to access your S3 buckets.
Creating a S3 Bucket
We now need to create a bucket in S3 to backup to. This is as simple as creating an IAM user.
Just navigate to the S3 section of the Management Console, and click on Create Bucket.
-
Set a name for the bucket. This name has to be completely unique from all other S3 buckets, and be a name that doesn’t clash with the DNS naming conventions.
-
Then select your region for the bucket to reside in. I picked Ireland as it’s my closest region.
-
Make sure Public Access is turned off!
-
Ignore Versioning and Tagging.
-
I decided to enable encryption for extra security and I chose the
SSE-S3option, which is Server Side encryption at rest using keys managed by S3.
After clicking Create Bucket, AWS will create the Bucket.
Installing and configuring the CLI tool
We now need to install and configure the aws-cli tool. I had a lot of difficulty with this step, and the reason for the repeated errors I was suffering was the the current version of aws-cli (v2) does not support 32-bit OS’, like the version of Raspbian I was running on my Raspberry Pi 3+. As far as I know, newer Raspberry Pi models (for example, the Pi 4), will work with v2 as they are using a 64-bit OS/CPU.
I used this guide from AWS to install the tool. I am linking it as the installation process could be subject to change since the writing of this article.
You now need to configure the CLI tool, by calling aws configure and supplying the following information.
- AWS Access Key ID from the .csv you downloaded and stashed away earlier.
- AWS Secret Access Key, also from the .csv file.
- Default Region Name, so for me I used Ireland, which is called
eu-west-1. - Default output format, which I set to
json, which is recomended by AWS.
We have now configured the tool with a AWS account, and can now backup our files.
Using the tool
We are going to use the sync function of S3. This compares the contents of my local backup and the bucket and downloads or uploads file so they both have the most up to date versions of files. It also cuts down on requests to the S3 service, as you only upload/download files that are new or have changed, not every single file like with the cp command.
We are going to use a variety of switches and flag to describe some extra functionality we need, like --storage-class STANDARD_IA, which tells S3 to set our objects as Standard Infrequent Access class, which is cheaper although has a slower rate of access and is made for data like backups. Because all we are doing is backing up, this works great for our use case. I wanted to exclude certain directories on my file server that I don’t want backed up for whatever reason. We can use --include and --exclude options to describe these directories.
I used the following command, where data is where I have mounted my external drive to the pi.
aws s3 sync data/ s3://<bucketname> --include 'data/*' --exclude 'data/Movies/*' --exclude 'data/TV Shows/*' --storage-class STANDARD_IA
The contents of the data will now be synced to your bucket, and you will have a offsite backup. This could take a long time, for me it took at least an hour or so.
If you want to your home backup to backup regularly to the bucket, you can enter a cron job to run the command every day, or every week (for example) so you have regular offsite backups. The more you call the command, the more request you make to S3, which will incur a greater cost, so you should be mindful of this when setting up a cronjob if you have a budget in mind, although the costs per 1000 commands are generally low for S3 Standard Infrequent Access.
Hopefully, you now have a offsite backup of a local storage solution that you aren’t paying over the odds for.